Mangery
Mangery
Mangery
Mangery
Mangery
Questionable Packaging Copy
Questionable Homeschoolery
Questionable Duration
Questionable Playlist
I Hate to Burst His Bubble, But...
Questionable Instructions
Questionable Treats
Questionable Propaganda
Manly
Questionable Feed
Airplane Doodles
Airplane Doodles
Airplane Doodles
Airplane Doodles
Questionable Freudian Slip
Haul
Questionable Degree of Specialization
Hmm...
Mangery
Mangery
Mangery
Mangery
Mangery
Mangery
Mangery
Mangery
Mangery
Mangery
Mangery
Warp Factor 7
Questionable Loo
Questionable Ingredients
Questionable Cookery
Beautiful Blueness
Questionable Souvenir
Capping Day
Questionable Fashions
Questionable Mural
The Gold Experience v.2
Questionable Instructions
See also...
Keywords
Authorizations, license
-
Visible by: Everyone -
All rights reserved
-
41 visits
Mangery


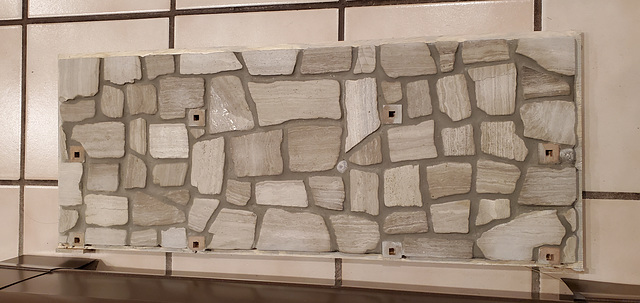
Base after grouting the tile.
The marble tile pieces started as two 12" square tiles from the big-box store. I pulled the pieces off the netting, spent about two hours arranging them, and broke a few and sanded the edges straight to close out a few gaps in the edges (esp. lower right corner).
The little squares are pieces of 3/8" thick MDF that I punched 1/4" square holes into using the chisel from a mortise bit. I measured, and measured, and measured again before and after gluing them in place, which paid off as they were each as close to the intended location as I could measure with the tools available. (Whew!)
The grout was the premixed "silver" color paired with the tile in the store display. When I mixed it I could see it would clearly be too bright, so I added a few drops of Old Mission and Brown Mahogany wood dyes to the mix. The results when dried were just a little lighter than shown here. I then sprayed it with a few coats of a matte acrylic sealer, which was a little shinier than I wanted but close enough.
It was only when I had everything glued that I A) realized I had a sizeable gap just right of center, and B) remembered that I had a box of small Petoskey stones (fossilized coral from northern lower Michigan) that I had intended to use for this project. Derp. At least I managed to squeeze in one of them.
- Keyboard shortcuts:
Jump to top
RSS feed- Latest comments - Subscribe to the comment feeds of this photo
- ipernity © 2007-2024
- Help & Contact
|
Club news
|
About ipernity
|
History |
ipernity Club & Prices |
Guide of good conduct
Donate | Group guidelines | Privacy policy | Terms of use | Statutes | In memoria -
Facebook
Twitter

Sign-in to write a comment.