
Cetona
Cetona
Near Castelmuzio
Near Castelmuzio
Near Castelmuzio
Castiglione del Lago
Castiglione del Lago
Near entrance to Zion National Park
Rialto Bridge, Venice
Dolomites
Dolomites
Cortina in the mist
Glencoe
Brecon Beacons
Brecon Beacons
Brecon Beacons
Nodal Drift. How accurate do you need to be aligne…
How I Made Four Horizontal Frames...
Panorama - Testing From Two Up / Two Down Horizont…
Vrsic Pass, Julian Alps
Vrsic Pass, Julian Alps
Prešeren Square, Ljubljana
Bar Cafe in Kongresni Square, Ljubljana
Bar Cafe in Ljubljana
Vrsic Pass, Julian Alps
Vrsic Pass, Julian Alps
Vrsic Pass, Julian Alps
Vrsic Pass, Julian Alps
Vrsic Pass, Julian Alps
Vrsic Pass, Julian Alps
Vrsic Pass, Julian Alps
Vrsic Pass, Julian Alps
Vrsic Pass, Julian Alps
Vrsic Pass, Julian Alps
Near Kranjska Gora, Julian Alps
Monument Valley
Authorizations, license
-
Visible by: Everyone -
All rights reserved
-
783 visits
Photo by Contrajur

Updated April 2017
This review is essentially based upon version 2.9 but there is little to the basics that has changed up to 3.0.25 issued this month, except those additional features that come along regularly like sharpening and correction of chromatic aberration. I need none of these because I always go into Photoshop afterwards to make local changes and prefer to do things like that there.
Machinery HDR Effects is a very good product and attractively priced. Do yourself a favour and give it a try. The trial version limits the output to files whose long dimension is 1280 pixels but otherwise it is fully functional. Then if you decide to remove that restriction, it will only cost you a moderate sum.
Normally you work on a preview of the image with all the features in it except that it is cut down to less pixels. This makes adjustments work much faster and the interaction as you move the controls is very good, usually close to instantaneous. Only when you have finished making adjustments need you have those settings applied to the full size image. The software then goes through the process of doing so and can take some time, but that is not a problem as no interaction is required once you reach that stage.
I have been using Machinery HDR Effects since March 2014 and ever since then there have been frequent updates with additional features that can be useful. Personally, I am most concerned at the core functions of being able to open RAW files, merge exposure bracketing without ghosting and combine them into as a result that has the best tonal gradation possible. You can save the result either as a TIFF or JPEG file.
Not only does Machinery fit the bill, it automatically sets the options to what usually gives perfectly satisfactory results without afterwards having to tweak the controls manually more than slightly in most cases to satisfy your preferences. It also does an excellent job of getting the best out of a single frame.
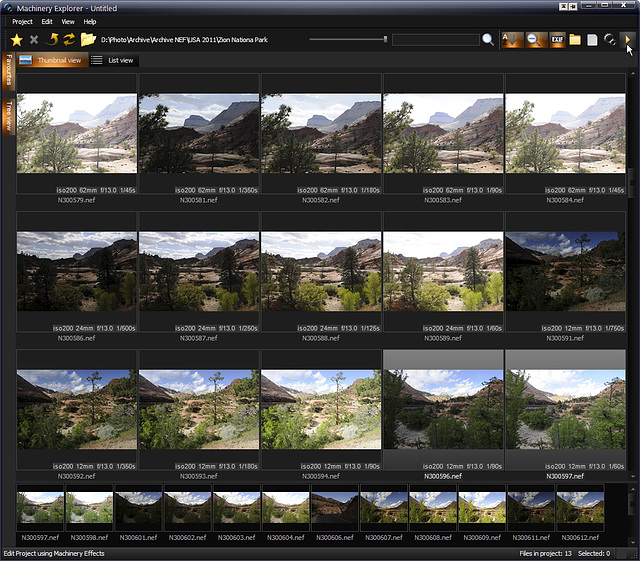
This image above is the thumbnail browser, which Machinery call the Explorer.
I have the folder tree on auto-hide but you can show it on the left fixed or hidden and easily change between all three. I selected frames for merging to HDR and dragged them below to form the project. This consists of two bracketed sets of exposures with the framing distinctly different as I moved my aim a little in between the two and a further single frame of something else in between which I accidentally included in the project.
Machinery had no trouble at all and very fast automatically produced the amazing result below, no ghosting or appearance of my phantom frame. If it does not look amazing to you, bear in mind that this is only the trial version which limits the resolution and I have not applied any sharpening.
The first time I used only the first bracketed set plus the rogue frame and it was close to perfection with little intervention needed from me to get as good as the result shown below. Given that my second attempt with all twelve frames needed no adjustment at all does make me wonder if it carried over some tone mapping influences from what I had done immediately before.
The tone mapping is very fast. In Photoshop afterwards I usually use Auto Levels, which I try just to get a check on how well I have set the brightness range from 0 to 255, Machinery usually gets it perfectly well adjusted automatically and not just with this project, with most of them.
The best way I have found to invoke the editor and to merge and tone map is to drag and then right click on the selected images in the project window at the bottom and then to select that option.
[Use the right arrow key to get to the next page and afterwards the left to move backwards]
Page 1 of 11
This review is essentially based upon version 2.9 but there is little to the basics that has changed up to 3.0.25 issued this month, except those additional features that come along regularly like sharpening and correction of chromatic aberration. I need none of these because I always go into Photoshop afterwards to make local changes and prefer to do things like that there.
Machinery HDR Effects is a very good product and attractively priced. Do yourself a favour and give it a try. The trial version limits the output to files whose long dimension is 1280 pixels but otherwise it is fully functional. Then if you decide to remove that restriction, it will only cost you a moderate sum.
Normally you work on a preview of the image with all the features in it except that it is cut down to less pixels. This makes adjustments work much faster and the interaction as you move the controls is very good, usually close to instantaneous. Only when you have finished making adjustments need you have those settings applied to the full size image. The software then goes through the process of doing so and can take some time, but that is not a problem as no interaction is required once you reach that stage.
I have been using Machinery HDR Effects since March 2014 and ever since then there have been frequent updates with additional features that can be useful. Personally, I am most concerned at the core functions of being able to open RAW files, merge exposure bracketing without ghosting and combine them into as a result that has the best tonal gradation possible. You can save the result either as a TIFF or JPEG file.
Not only does Machinery fit the bill, it automatically sets the options to what usually gives perfectly satisfactory results without afterwards having to tweak the controls manually more than slightly in most cases to satisfy your preferences. It also does an excellent job of getting the best out of a single frame.
This image above is the thumbnail browser, which Machinery call the Explorer.
I have the folder tree on auto-hide but you can show it on the left fixed or hidden and easily change between all three. I selected frames for merging to HDR and dragged them below to form the project. This consists of two bracketed sets of exposures with the framing distinctly different as I moved my aim a little in between the two and a further single frame of something else in between which I accidentally included in the project.
Machinery had no trouble at all and very fast automatically produced the amazing result below, no ghosting or appearance of my phantom frame. If it does not look amazing to you, bear in mind that this is only the trial version which limits the resolution and I have not applied any sharpening.
The first time I used only the first bracketed set plus the rogue frame and it was close to perfection with little intervention needed from me to get as good as the result shown below. Given that my second attempt with all twelve frames needed no adjustment at all does make me wonder if it carried over some tone mapping influences from what I had done immediately before.
The tone mapping is very fast. In Photoshop afterwards I usually use Auto Levels, which I try just to get a check on how well I have set the brightness range from 0 to 255, Machinery usually gets it perfectly well adjusted automatically and not just with this project, with most of them.
The best way I have found to invoke the editor and to merge and tone map is to drag and then right click on the selected images in the project window at the bottom and then to select that option.
[Use the right arrow key to get to the next page and afterwards the left to move backwards]
Page 1 of 11
- Keyboard shortcuts:
Jump to top
RSS feed- Latest comments - Subscribe to the comment feeds of this photo
- ipernity © 2007-2024
- Help & Contact
|
Club news
|
About ipernity
|
History |
ipernity Club & Prices |
Guide of good conduct
Donate | Group guidelines | Privacy policy | Terms of use | Statutes | In memoria -
Facebook
Twitter