Dolly Project
My seemingly unending project to build a simple camera dolly for doing timelapses and whatnot.
10 Apr 2014
A Brain for Dolly
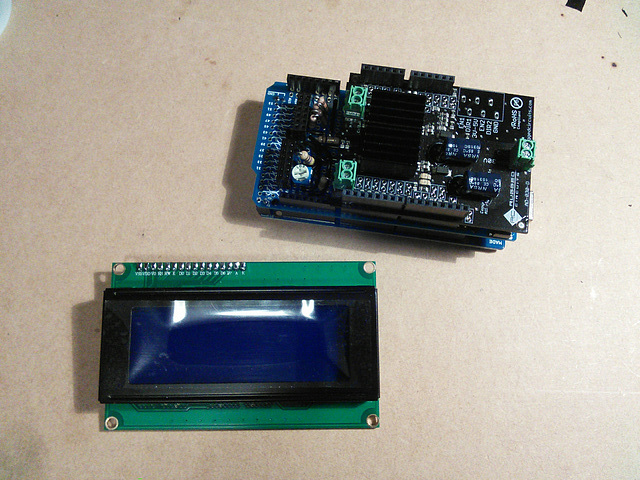
The "production" version of the Arduino shield stack used to run the camera dolly.
On the bottom of the stack is an Arduino Mega 2650. Then comes the hand-made card with five different circuits: a resistor ladder and socket for the controller's input buttons, the breakout and socket for the display harness, the OR-gate and resistor network for the limit switches, the opto-isolators for driving the camera via wired remote, and a little piezo beeper. Finally comes the Rugged stepper motor controller card.
12V input power drives the dolly via the green connector on the right (the stepper card helpfully feeds power to everything else). The little pot on the left side of the middle card controls the contrast on the display, whose harness plugs into the adjacent black header.
Everything is connectorized, due to lessons learned from the lightning trigger project - every switch, plug, etc. can be dismantled from it's associated board either by pulling a connector out or loosening a screw post. This came in handy when I got the first copy of the faceplate together and discovered it wouldn't fit in the box I'd bought - had everything not been connectorized, I'd have had to tediously de-solder everything, breaking the tested configuration and requiring it all to be tested again after it was reassembled on the new faceplate. (A trick I learned working on rockets. Don't ever say your defense procurement dollars are totally wasted.)
10 Apr 2014
A Brain for Dolly
The "production" version of the Arduino shield stack used to run the camera dolly.
In order to fit in a reasonable sized box, I combined five functions into one: the limit switches from the dolly, the camera interface, the button interface for controlling the electronics, the interface for the display, and a piezo beeper.
After taking this picture, I ended up having to rewire the optoisolators (middle top) and troubleshoot a crossed wire in the display header (lower left), and added the headers in the upper right for the lines to the camera remote and limit switch panel jacks. Not bad. I was expecting more than two screwups, and it was really only one (the display header) when you consider all the inexplicable trouble I've had with optoisolators - I figured those would turn out to be wired wrong no matter what I did, and I was right.
Now to build the box, and finish the software.
06 Sep 2014
Third Time
... is hopefully the charm, with 3D printing a faceplate for the dolly controller.
Attempt #1 ended in failure when the printhead clogged halfway through.
Attempt #2 turned out to be about 3mm too wide - which unfortunately couldn't be fixed by shaving a little off either side, since the rightmost button and the display on the left were too close to the edges. Plus, all the holes seemed to be about .5-.7mm smaller than designed - except the 3mm hole for the tiny panel jack for the camera remote, which was about a whole millimeter too large somehow.
Attempt #3 turned out to be nearly perfect. The holes were the right size the first time, apart from the display opening which required just a little cleanup of flash from the printing process. The only rework (apart from sanding the surface down to #600 and waxing and buffing it) was to sand the edges to fit the slightly bowed perimeter of the box, like an old TV screen, something I couldn't readily measure and reproduce in the CAD model.
None of my pictures capture it, but the surface is polished to a dull sheen (not gloss - it's for photography) which reveals the pattern of the 3D printing process as an optical effect akin to woven cloth. This surprised me, as I expected it to be a uniform featureless black once the as-printed surface was polished away. The button at the top right looks a little different because there is a counterbore on the backside to account for the thickness of a washer on the front (this is the start-stop button, so is treated differently from the others) - the optical effect is consequently a little bit different, for reasons not unlike the trick behind a Japanese "magic mirror".
06 Sep 2014
1 favorite
1 comment
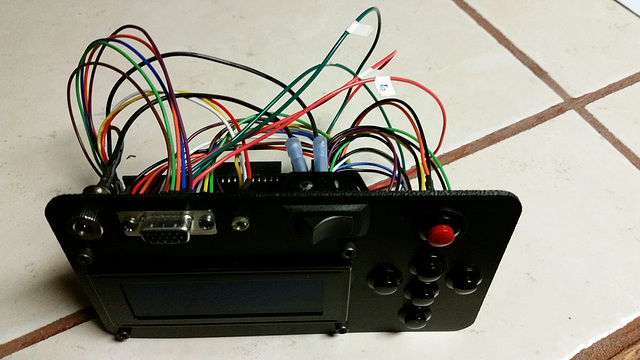
Some Assembly Work Later....
The dolly controller, finally assembled and ready for troubleshooting. Of which I expect there to be much.
09 Sep 2014
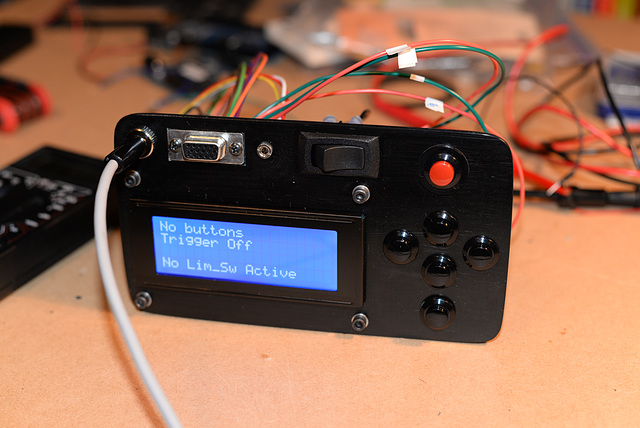
The Brain Lives
First power-up of the dolly controller under its own power source.
It didn't burst into flame or start throwing off lightning bolts, which is good. Now it just needs to have all the harnesses reworked so that it will fit in the enclosure.
Note the gently rounded sides of the faceplate, where it's been sanded to fit the bowed profile of the enclosure.
Jump to top
RSS feed- Latest items - Subscribe to the latest items added to this album
- ipernity © 2007-2025
- Help & Contact
|
Club news
|
About ipernity
|
History |
ipernity Club & Prices |
Guide of good conduct
Donate | Group guidelines | Privacy policy | Terms of use | Statutes | In memoria -
Facebook
X


